How to Start Your Top Bar Hive
There are several ways to start your top bar hive. One is to begin by buying a package of bees from a bee supplier. When you order packaged bees, your supplier will set an arrival date, and he will mail the bees to you in time for them to arrive on that date. The bees will be shipped in a wooden box with wire screen on two sides for ventilation, and the package will contain three or four pounds of worker bees and a queen. Each package ships with a can of syrup to feed the bees during transit.

Preparing for Arrival
Before your bees arrive, there are several things you need to do to be ready for them. First, paint your hive, allowing enough time for it to dry thoroughly, and set it in place. When your bees arrive, you will need to have each of the following on hand:
- Hive tool
- Pliers
- Spray bottle of sugar water (recipe below)
- Bee feeder for feeding sugar water to your bees (recipe below)
- Sugar water. To make sugar water, mix one cup of sugar with one cup of room-temperature water in a quart jar. You will use sugar water in your spray bottle and in the bee feeder.
Installing a Package of Bees
When your bees arrive, remove ten top bars from the hive, and place the bars next to the hive. Your hive has one divider board. Place that divider board in the space that had been occupied by the tenth bar. Since the new bees will have to work to keep the hive warm, it is best not to give them too much space. Using the spray bottle of sugar water, lightly spray the packaged bees through the screen. This helps calm them. Remove the cardboard shipping label that covers the top of the bee package. With a pair of pliers, remove the can of syrup. Spray the bees again with sugar water. The queen will be in a queen cage that is hung in the package next to the can of syrup. Using the hive tool, remove the staples that hold the queen cage in place.

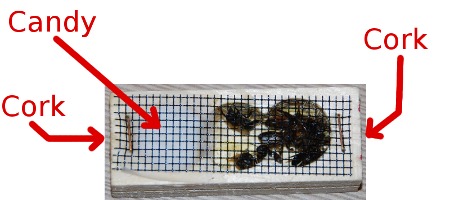
There are two common types of queen cages. One is wooden with three sections in it. Two of the sections will have the queen and a few worker bees. The last section will be filled with sugar candy. On each end of the cage is a cork. Remove the cork on the end of the cage that has the candy. After you have finished setting up your hive, the bees will eat through the candy and release the queen.

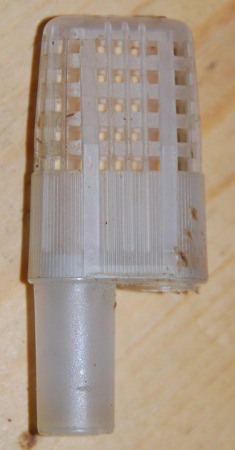
The second type of queen cage is made of plastic and has a candy-filled tube extending from the bottom of the cage. On the end of the tube is a cap. Remove the cap.

When the bees and queen are packaged, they are taken from many different hives, so the bees are not familiar with the new queen. As the bees eat through the candy, it takes time, and during that time they become accustomed to their new queen. Take a nail and remove some of the sugar candy. This will help the bees release the queen much more quickly. Next take the queen cage and hang it between two top bars. Place the two top bars and cage in the hive.


Now take the package and begin pouring the bees into the hive. You will need to shake the package several times to remove all the bees that cling to the screen.

Once the bees are in the hive, spray them lightly with sugar water. This will keep them from flying everywhere. Fill the feeder with sugar water and place it in the entrance of the hive so the bees can access it from inside the hive. It is best to feed your bees sugar water at least twice a week for the first three weeks. After that, feed them once a week until they fill one comb with honey. This full comb of honey will ensure that the bees have enough food.

Checking the Hive for the First Time
Check the hive six to seven days after you started it, to make sure the bees were able to release the queen. After removing the hive roof, take your hive tool and remove the top bar that is next to the divider. Then look inside. If the bees have not yet built a comb on the next top bar, slide it toward the divider board. Continue until you see the combs. Carefully remove the first bar with comb.

This comb will be very small and fragile. To find out whether the queen is laying and in good health, check the comb that you just removed for the presence of eggs. Look for eggs at the bottom of the cells. Each egg will look like a very small grain of rice. Continue with all the combs. If for some reason there is no sign of eggs, check the queen cage. If the queen did not get out, you can release her by removing the screen and letting her walk out onto a comb.

The bees will start to build comb very rapidly during the first week, and they will most likely build three to four combs. The second week, there may be as many as seven combs. It is important to make sure the combs are built straight. If one comb starts to get crooked, all the combs adjacent to it will be crooked. It is easy to fix this when the hive is first starting. Take your hive tool and straighten the comb by pressing on it in the direction that it needs to go. You can also rotate the whole bar and comb so the spot that started to get crooked will be adjacent to the straight part of the comb next to it.
It is a good practice not to harvest any honey the first year, even if the hive has extra. The bees need as much honey the first year as possible to make it through the winter.
Related Information:
- An Introduction to the Top Bar Hive (Article)
- Essential Beekeeping Tools (Article)

Thanks for this great blog post on hiving bees! Due to your great intensive two day bee class we took with Jake, my husband and I can now officially call ourselves “Beekeepers”! We hived two packages of bees last night in two top bar hives. We couldn’t have done it without the direction and education we received in y’alls beginner and advanced bee class!
Many thanks,
Rashel Harris, Palestine Texas
Jake, I loved your class. I have placed my 2 queens in the 2 Top Bar Hives I got from you, and they are doing awesome. I can’t believe how fast they make their honey comb. I was wanting to see about ordering some more Top Bar Hives from you, but did not know how to contact you?
Sincerely,
Robin Young, Northlake Texas
Robin,
That’s great to hear your hives are doing well. I’ll ask Jake to contact you about ordering more top bar hives.
—
Matthew
Thank you so so much for this! I am getting my bees next week (I have been warned it’s a little late) and I have had such a hard time finding great instructions for top bar hives, even in the books I have read! Thank you! Couple quick questions if you don’t mind…..can the divider board just be a piece of plywood that fits snugly into the hive? How do I attach the queen cage to the top bars? Thank you so very much!:)
Ashley,
You’re welcome. For the divider, plywood would be fine. It will need to fit the shape of the hive snugly and extend high enough that the top bars will hold it in place and keep it from falling over.
Usually, queen cages come with a small plastic or wire strap. If your queen cage has that, then you can hook it over the top of a top bar. If the queen cage doesn’t have a strap, then you can use a “twist tie” (the sort of thing that you would twist around a bread bag or trash bag to close it) to attach the cage to a top bar.
Hello again! Just hived my bees in the TBH this past Monday. I was going to start with 10 bars but the guy I got them from told me to start with 14. How do I know when to start adding topbars/moving the follower board? Do I wait until all the bars are full? No honey harvest this year as it’s their first year in the hive but all 20 should be full before the start of winter, correct? Thank you!!
Ashley,
As a general rule, I recommend that you keep 3 empty bars between the comb and the follower. This is a good thing to look for each time you check the hive (it’s good to continue checking the hive regularly, twice a month). Since you are starting them late in the season, it would also be a good idea to feed your bees regularly (sugar water) until they build up 4 full combs of stored honey. At this point in the season, they will probably build up to about 10 combs by winter. You’re correct on waiting until next year before harvesting any honey. Let us know if you have any other questions.